Mushroom-Shaped Chocolate-Orange Meringues

Whimsical party food to impress.

Froot Loop Cupcakes (USA)

Fancy dressing up your vanilla cupcakes?

Creamy Chicken Tetrazzini

Savory and creamy comfort food!

I-Disgust-Me BBQ Burgers

A burger for when you've stopped caring about fat content. The only thing missing is bacon!

Crab-Topped Deviled Eggs

Eggcelent. Yeah, I went there.

Chicken-Fried Chicken with Country Gravy Dipping Sauce

Double-coated for extra CRUNCH.

Red-Bottom Cake

Imagine if a black-bottom cupcake had a baby with a red velvet cake. Now imagine a red-bottom cake. Simply another excuse to eat cream cheese frosting.

A Rather Traditional Pavlova

Dreaming of a sunny summer day in food format?

Orange Beef Burgers

A chinese takeaway in burger form.

Mexican-Inspired: Cheesy Refried Bean Quesadillas

I beat Taco Bell to their own crushed-Dorito food hell with these babies.

Marsala Chicken Dumplings

Dumplings get a makeover.

Mochacinno Fudge

Premium coffee drink fudge!

Parmesan Chicken Risotto

Risotto for picky eaters!

Whimsical Cookery is a site for adults who prefer to eat like children, or perhaps just need to cook for some children. This site contains an aversion to vegetables, a love of fried food and cupcakes, lazy shortcuts, some disturbing creations, and an ignorance of proper culinary practices...

Saturday 19 September 2015

Grilled Rosemary, Sea Salt, and Virgin Olive Oil Flatbread


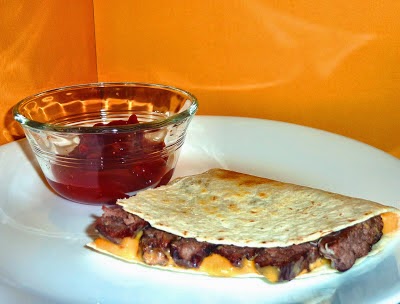
And now for something completely different... as you can probably see, I have been on a bit of an east asian food kick lately.  Best to mix things up a bit!  Since I recently had access to a grill, I thought I'd try my hand at some grilled flatbreads. These are warm, fluffy, and lightly seasoned with rosemary, sea salt, and tiny pools of olive oil goodness.

This recipe uses a modified version of my basic pizza dough (using bread flour and longer rising times).

You will need:
1 packet quick rise-dry yeast
1 cup water
2 Tbsp oil
1/2 Tbsp sugar
1 tsp salt
2 1/2 cups (strong) bread flour
2 Tbsp fresh rosemary, chopped
Sea salt 
Virgin olive oil

Yield: 3 large flatbreads or 4 medium

1. Combine dry ingredients: salt, sugar, flour, and yeast in a medium bowl.

2. Heat water to 130F/55C, immediately add water (once heated) and oil. Stir until thick.

3. Turn dough onto floured surface, kneading for 5 minutes.

4. Return dough to bowl and cover with kitchen towel, let sit for 30 minutes.

5. Divide dough into 3 (or 4) sections and roll out to about 1/4 inch thickness (just over 1/2 cm).

6. Lightly oil your grill and allow bread to cook.  As temperatures will vary greatly depending on heat of the coals (you can be more precise and take your time if using a gas grill), it is important to flip up an edge and check for charring.  As we worked with super-hot coals, we found that just 1.5 minutes on each side was more than enough.

7. As soon as bread is off the grill, brush with oil and dust with rosemary and sea salt to taste.  Serve immediately for best taste, or reheat briefly in the oven.

Wednesday 2 September 2015

Korean Fried Chicken Strips


Spicy and uniquely flavored by a gochujang paste-based sauce, these crispy chicken strips are a great (and fairly simple) homemade version of Korean fried chicken wings.  I had been meaning to make Korean fried chicken for years now.  However, I have to remember that I want to make it in advance of a trip to Chinatown... and I finally remembered!  If you do not have a Chinatown and your supermarket's international food section is poor, it might be worth trying Amazon for gochujang.  Gochujang is also a standout ingredient in the sauce for Bibimbap!
Anyways, back to the fried chicken!

For the sauce you will need:
2 Tbsp gochujang paste
1 Tbsp Sriracha
2 Tbsp ketchup
3 Tbsp rice wine vinegar
1 Tbsp toasted sesame oil
1 Tbsp butter
4 Tbsp caster sugar

For the fried chicken you will need:
600g (approx 1.3lb) chicken breast fillets (strips)
6 Tbsp self-raising flour
3 Tbsp sweet potato flour
3 Tbsp rice flour
1 tsp salt
1/8 tsp ground black pepper
Oil for frying
 
Garnish:
Sesame seeds
Spring onion

Yield 2 generous servings

1. Prepare the sauce by adding gochujang, Sriracha, ketchup, rice wine vinegar, toasted sesame oil, butter, and caster sugar to a medium pan.  Bring to a boil and remove from heat immediately.  Set aside.

2. In a large plastic food bag, add self-raising flour, sweet potato flour, rice flour, salt, and pepper.  Close bag and shake to mix.

3. Rinse chicken and remove tendons if needed.  Add to bag of flour and re-close bag.

4. Shake until chicken is coated in flour mixture.

5. Heat oil.  Ideally chicken would be deep fried for approximately 6-8 minutes at 190C/375F or until they take on a golden hue.  Alternatively, you can shallow fry for around 5 minutes on each side until the desired color.  Ensure chicken is piping hot and cooked through.

6. Drain excess oil from chicken and turn immediately into pot of chilli sauce.  Cover with a lid and shake/toss to coat chicken.

7 Serve immediately, garnished with sesame seeds and spring onions if desired.

Tuesday 25 August 2015

Hiroshima-style Okonomiyaki


I made Hiroshima-style Okonomiyaki a couple months ago.  And then a million times over since then.  We are crazy for Okonomiyaki!  It is not quite like anything I've ever eaten or cooked before.  Familiar flavors, such as the savory pancake and noodles mix with the smokey katsuobushi (bonito fish flakes) and Okonomi sauce which were new to me! I highly recommend heading here for a step-by-step guide to Okonomiyaki.  Or you can find the (I think more common?) Osaka style here.


Happy Okonomiyaki-ing!

Friday 14 August 2015

Grilled Salmon Bento


My husband and I have been greedily trying Japanese food all over London, as we simply cannot get enough!  However, that is an expensive hobby, so at some point we had to start doing our best to reproduce some of the wonderful food we've tried at home.  The recipe for rice balls (below) makes a great vegetarian side dish or would be good for little (or picky!) fingers!

Grilled Teriyaki Salmon and Greens Salad
You will need:
1/4 cup mirin
1/4 cup sake (cheapest available seems to work fine!)
1/4 cup dark soy sauce
2 tablespoons sugar
1 Tbsp toasted sesame oil
400g (14oz) salmon
1/3 cup edamame
100g (3.5oz) fine green beans, blanched
100g (3.5oz) broccoli, blanched
1 cup sushi rice (uncooked)

Yield 2 servings

1. Prepare sushi rice by rinsing, soaking for half an hour, and then cook according to package instructions.  You may wish to season it with 1 Tbsp rice vinegar (or to taste).

2. Combine mirin and sake over a medium/low heat for 5 minutes.  Add soy sauce and sugar and stir until sugar dissolves.

3. Reduce to low heat and simmer for 15 minutes to allow the sauce to thicken.

4. While sauce thickens, oil a medium frying pan or skillet or prepare your grill.  If grilling, you may prefer to oil the the cuts of salmon directly.

5. Lightly sear the outside of the salmon and then coat in teriyaki sauce.

6. Cook salmon through, cooking times vary based on heat and size of cuts.  You should have a nice carlmelised teriyaki crust on the salmon.

7. Serve over a bed of sushi rice with greens.

8. I chilled these meals in the fridge, though you could serve heated.  

Veggie Rice Balls (Great for picky eaters!)
You will need:
1/4 cup shredded carrot
1/4 cup broccoli (omit stems)
1 Tbsp thinnly sliced spring onions
1 Tbsp rice vinegar
1 cup uncook sushi rice

Yield: 6 rice balls

1. Cook sushi rice according to package instructions.

2. Prepare the veg while the rice cooks.  In a food processor, add carrot, broccoli, and spring onions.  Add rice vinegar and pulse until you have a paste.

3. Once rice is cooked, fold in veggie paste using a rice paddle.  Work quickly and re-cover and allow steam to soften the veggie paste for a minute or two.

4. Allow rice to cool for a bit, then shape into balls.  This can be easily done by wetting your hands and shaping them by band.  Serve with teriyaki sauce


Tuesday 19 May 2015

Bacon Bourbon Burger


It is time for summer and cookouts!  Well... soon. Very soon.  I may have jumped the gun a bit with a new burger recipe!  As this recipe is focused around the sauce, I will, perhaps once again, jump the gun and assume if you are reading this you already know how to cook a burger, form burger patties, and grill or fry up bacon.

You will need:
4 burger patties, seasoned and formed but not cooked
8 thick cut bacon rashers, cooked
4 slices mature cheddar
4 buns, toasted

For bourbon sauce you will need:
2/3 cup bourbon
1 cup water
1 Tbsp corn starch (corn flour UK)
Pinch of pepper
Pinch of salt
Pinch of cayenne pepper
Pinch of garlic powder
1 Tbsp hickory bbq sauce
2 Tbsp dark soy sauce
1 tsp ground mustard
1 tsp hot sauce (we used Louisiana brand)
2 Tbsp honey
1/2 cup packed dark brown sugar

Note: It is recommended that you start by making the bourbon sauce and setting it aside while burgers are prepared.

1. In a small pot, heat bourbon, bbq sauce, soy sauce, mustard, hot sauce, honey, and brown sugar. Bring to a low boil for 2 minutes, stirring occasionally.

2. Add a pinch of pepper, salt, cayenne pepper, and garlic powder.

3. Dissolve corn starch in water and add to mixture.  Stir until sauce thickens and set aside.

4. Grill or pan fry burgers until somewhere between medium rare and medium.  Half-way through cooking, you may wish to brush the burgers with the bourbon sauce.

5. Immediately top burgers with cheese, bacon, and drizzle bourbon sauce.

6. Place on bun and serve.  Yum!

Thursday 7 May 2015

Ginger-Sake Fried Chicken Bites


This recipe is basically a knockoff of Chicken Karaage.  It utilises the intense ginger flavors and the warming sake typical of Chicken Karaage.  However, I have spun the authentic recipe to my own tastes and way of cooking (for example, I prefer to cook with chicken breast, instead of thighs).  This chicken is extremely tasty, juicy, addictive, and palatable to many picky eaters!

You will need for marinade:
4 medium chicken breasts (about 500g/1 lb)
2 tsp ginger paste (or fresh grated ginger)
1/8 tsp garlic powder
1 1/2 Tbsp dark soy sauce
3 Tbsp Sake

After marinading, you will need:

3/4 cup flour
1/2 tsp ground black pepper
1/2 tsp salt
Oil for deep or shallow frying, I recommend part toasted sesame/part canola oil if shallow frying and canola oil if deep frying

1. The first step is to cut chicken breast into bite size pieces and marinade in a large plastic bag with ginger paste, garlic powder, soy sauce, and sake.  If you are marinading overnight, do not add the soy sauce until an hour before preparation, as it may draw moisture from your chicken.  Marinate in the fridge for at least an hour (or overnight for more intense flavor).

2. Add the flour, pepper, and salt to the bag, and shake!

3. Once all chicken has been coated, you have two frying options.
a.) Fill a large skillet with just under 1cm of oil and fry over a medium heat until coating is crispy and chicken is cooked.
b.) Deep fry at 175C/350F.

Both methods take 5-8 minutes, depending on size of chicken pieces. Deep frying is a bit closer to 5 minutes.

Serve hot and fresh from frying!


Wednesday 22 April 2015

Cinnamon Milk


I love Cinnamon Milk!  It is a quick and easy thing to make, but always well-received by guests and family!  It is especially great in the summer or after some spicy food.  Cinnamon Milk is ice cold, refreshing, and sweet!

You will need:
3 cups rice milk
3 cups almond milk
3 cinnamon sticks
1/4 tsp ground cinnamon (and extra for garnish)
1/3 cup sugar

In a heavy saucepan, combine all ingredients.  Break up the cinnamon sticks for extra flavor.  Stir constantly over a medium-low heat for 10 minutes. Pour through sieve into large serving jug and refrigerate once at room temperature.

Serve over ice.

Thursday 5 February 2015

Steamed Buns (Chili-Lime Beef or Battered Fish w/ Sriracha Sauce)


This recipe is also perfect for picky eaters, as you can fill them any way an individual desires!

Recipes:

Recipe for chili lime sauce for beef (Under Lime and Chili Marinade)

Recipe for Sriracha Cream Sauce

Recipe for battered fish from Jamie Oliver (ignore the chips and mushy peas)

For the buns you will need:
1/2 package dried yeast
1/2 cup water (between 120° F–130° F /49° C–55° C)
2 cups flour (suggest using low-gluten bun flour, but not necessary)
1/8 cup sugar
1 tsp salt
1 Tbsp vegetable oil
Toasted sesame oil (for brushing on outside of buns)

1. Dissolve yeast in the warm water and add 1/2 cup of the flour.  Combine and cover with cloth.  Allow to rise for 45 minutes.

2. Combine vegetable oil, salt, sugar, and 1/4 cup boiling water.  Allow to become room temperature.
3. Add remaining flour.

4. Turn dough onto floured surface and kneed until smooth.

5. Place in large greased bowl and cover with a damp cloth.  Allow to rise for approximately 2 hours or until doubled in size.

6. Divide dough into 8 equal sections and roll each into a ball.  Flatten into pancakes about 1/4 inch thick.

7. Brush both sides with sesame oil and fold dough over (it should look a bit like a taco).

8. Steam buns for approximately 10-15 minutes.  Fill and serve immediately.


Saturday 17 January 2015

Angry Pig Fries


I wasn't going to put this up, as it is not much of a recipe.  However, it got quite a reaction!  So I submit to you, Angry Pig Fries.

You will need:
1 roasting tray of fries (I chose curly and seasoned)
2/3 cup grated mature cheddar cheese
400g pulled pork, prepared or leftovers
Hot sauce of choice (we used Louisiana, but Sriracha might be amazing as well)

If you need to prepare the pulled pork, do so first and set aside.  Do not add bbq sauce unless you prefer that to hot sauce.
Bake (or fry) your fries according to package directions.  Once crispy, sprinkle grated cheese over and replace in the oven for about 1 minute (keep an eye on it, as you want the cheese to be melted, not starting to broil).  Tip onto a plate and top with pulled pork.  Sprinkle with hot sauce and serve with mayonnaise.

Monday 5 January 2015

Soy, Honey, and Brown Sugar-Glazed Roast Sweet Potatoes


This super sweet and sticky side dish makes a wonderful addition to a meal!  It is particularly good with fried foods and roasts (and would therefore be a great addition to a Thanksgiving or holiday meal). It is so hard to stop eating this all in one go!  It's also easy on your budget and goes down well with picky eaters.

You will need:
3 medium sweet potatoes
1 Tbsp soy sauce
1 Tbsp brown sugar
1/8 tsp Worcestershire sauce
Honey for drizzling
Toasted Sesame Oil for brushing on potatoes

1. Wash and peel sweet potatoes.  Cut into small cubes.

2. Arrange on a roasting tin over parchment paper.

3. Brush with toasted sesame oil and bake for 25 minutes at 200 C / 400 F.

4. While potatoes are roasting, combine soy sauce, brown sugar, and Worcestershire sauce in a small bowl.

5. After 25 minutes, brush potatoes with sauce.  (Very) lightly drizzle honey over potatoes and replace in oven for an additional 15-20 minutes.

Thursday 25 December 2014

Merry Christmas and Happy Holidays!!


Wednesday 17 December 2014

Eggnog Truffles


I loooveed the idea of making something with eggnog this year and finally settled on this! I toyed with the idea of making a white chocolate and eggnog ganache for the inside, however, due to white chocolate's low melting point and adding in the liquid of the eggnog I decided to go with a method sometimes used in fudge making, using marshmallow fluff! However, if you sub some of the cream in a ganache with eggnog I still feel like it might work? Nevertheless, here is my full-proof recipe below!

You will need:
1/3 cup eggnog
1 cup granulated sugar
1/4 cup butter
1/2 tsp rum flavoring, or to taste
1/2 tsp nutmeg
Pinch of cinnamon
1 1/2 cup white chocolate chips
1/2 cup marshmallow fluff
1 lb white candy coating or similar quality white chocolate
Nutmeg for garnish

Yield: approx 30 truffles

1. In a medium saucepan, whisk together eggnog and sugar. Add butter and keep on a low boil over medium heat for a couple minutes. Add in rum flavoring and marshmallow fluff, and whisk gently. Remove from heat as soon as marshmallow combines and add nutmeg and cinnamon.

2. With a wooden spoon, combine the white chocolate chips with eggnog mixture.

3. Once melted, pour onto a jelly role pan that has been lined with parchment paper. Refrigerate for a couple hours or until stiff.

4. To roll balls, cut out even sized squares of the truffle. The truffles look great at just under 1 inch in size.

5. Return balls to jelly role pan and this time freeze for an hour or until very firm.

6. Melt your white candy coating (they usually suggest 30 seconds at a time in the microwave at half power) in a small microwave safe bowl (just large enough to fit the chocolate is perfect).

7. Line another pan or cookie sheet with waxed paper, parchment paper, or non stick foil.

8. To dip, stick a toothpick into the side of the truffle you are dipping, cover in white chocolate, ensuring the whole area including the toothpick area is covered. Working quickly, set the truffle on your lined pan and use another toothpick to guide the truffle away from the embedded toothpick. Patch the hole with surrounding chocolate and quickly sprinkle nutmeg (which nicely hides any poor patch jobs!).

9. Return to fridge until solid and store covered in a cool place or refrigerate

Sunday 7 December 2014

Tangy Peanut-Ginger Slaw


I realised that I haven't uploaded many side dishes to this site.  The first recipe I'd like to formally present as a side dish is one of my husband's favorites, my tangy peanut-ginger slaw.  It is lighter than regular coleslaw, but just as easy to prepare.

You will need:
1/2 cup shredded red cabbage
1/2 cup shredded white cabbage
2 Tbsp thinly sliced spring onions
1/4 cup julienned carrots
1 tsp peanut butter
2 tsp dark soy sauce
1 tsp rice wine vinegar
1 tsp dark brown sugar
1 tsp ginger paste (or fresh minced ginger)

1. In a large bowl, combine veggies and toss.

2. In a small bowl, combine peanut butter, soy sauce, rice wine vinegar, brown sugar, and ginger paste.  Stir with a fork until peanut butter is finely incorporated.

3. Tip sauce over veggies and toss again. Add sauce a little bit at a time to get the right amount of moisture, as you don't want it to be soggy.

4. Serve as soon as possible for crispier fresher taste!

Friday 28 November 2014

New Christmas Tag!


I know that the header photo for this should be food related, but look how festive she is! 

Whimsical Cookery has a new Christmas tag for the holidays.  I come from a background of enthusiastic and obsessive Christmas holiday baking and cooking, however I'm sure most of these recipes would suit any holiday your family celebrates!  CLICK HERE TO CHECK IT OUT
Alternatively, it can be found in the Dessert drop down menu.

I'd like to share some recipes from holidays past... a list that will surely be added to this year!

http://whimsicalcookery.blogspot.co.uk/2013/12/mint-christmas-tree-meringues.html

http://whimsicalcookery.blogspot.co.uk/2012/12/holiday-sugar-cookies-w-egg-free-faux.html

http://whimsicalcookery.blogspot.co.uk/2012/12/mint-chocolate-snowball-cookies-egg.html

http://whimsicalcookery.blogspot.co.uk/2012/08/dark-chocolate-mint-chocolate-truffles.html

http://whimsicalcookery.blogspot.co.uk/2010/07/mochacinno-fudge.html

http://whimsicalcookery.blogspot.co.uk/2012/12/hot-orange-spice-mocha-drink.html


Wednesday 19 November 2014

Sriracha Cream Sauce


This recipe has been so enjoyed in our house I thought it warranted it's own post!  Sriracha cream sauce is good on almost anything.  A dip for chicken, a sauce for fried fish tacos, a sauce for salmon, a mayo-replacement in a sandwich, or as a salad cream, it's all good!  It is extremely versatile and makes almost anything extra-delicious!!  This recipe is made from an amalgamation of sriracha sauces I've found online.  This.  This one is the magic one.


Yield: Approximately 1 1/2 cups sauce

You will need:
1 cup mayonnaise (light is fine)
1/3 cup condensed milk (again, light is fine)
3 1/2 Tbsp Sriracha sauce

Simply whisk all ingredients together and serve.  I bottle mine so that I have it on hand when I get a craving!

Tuesday 11 November 2014

Pondering Mole Sauces


I'm not even going to pretend that I know the secret to an authentic mole sauce recipe.  I have perused many recipes and have transformed them into something that suits my taste.

Top mole recipes:
Thick and flavorful, by AllRecipes
Dark and rich, by Nick via Macheesmo
Nice and comparatively simple, by EatingWell
Interesting flavors and a bit different by Juliann Esquivel via Just A Pinch

As you can see, there are so many different ways to make a mole.  My absolute favorites always feature chocolate or cocoa though!  Give a recipe a try if you have some time, or invent your own version!

I've served my chicken mole in small white corn tortillas, as I cannot get enough of the flavor and texture they bring to my tacos.

Sunday 2 November 2014

Weeknight Fried Chicken 'n Biscuits w/ Sriracha-Honey Butter (USA)


Chicken and biscuits are always a crowd pleaser.  Alas, I did not come up with the beautiful recipe for Sriracha-Honey Butter.  It was found here, by Rachel Ray.  However, this is a great recipe to make on a weeknight when you are in a hurry!

Looking for a healthier version?  No problem.  Substitute the fried chicken for grilled chicken.  And substitute the butter for margarine.

You will need:
4 Country fried chicken breast patties
1/2 tube (4) refrigerated biscuits (I used Pillsbury)
8 pickle slices
---
1/2 cup butter, at room temperature
1 tablespoon honey
2 teaspoons sriracha (or to taste)

Yield: 4 chicken and biscuit sandwiches

1. Simply pop the chicken and the biscuits in the oven according to manufacturer's instructions.

2. In the mean time, you can prepare the Sriracha-Honey Butter by combining butter, honey, and sriracha sauce in a small bowl.

3. When chicken and biscuits are done, slice the biscuits in half.  Assemble your sandwiches with the Sriracha-Honey Butter spread on the bottom half of the biscuit, then chicken, pickles, and topped off with the other half of your biscuit.  You may wish to melt a bit of your butter to paint on top of the biscuit, depending on how messy you like things!

Wednesday 22 October 2014

Peanut Butter Silk and Fudge Pie


There are two ways of making this diner favorite, an express way, and from scratch.  To make the crust from scratch, simply crush oreos (or the chocolate biscuit part of the oreo) until you have 1 1/4 cup, combine with a spot of melted butter and press into the base of your pan.  This is baked for about 5 minutes at 350F/175C.
The second bit that can be made from scratch is the chocolate fudge.  Chocolate fudge is not difficult to make, you simply melt 1/2 tin condensed milk (that is 400g or about 14 oz) and 175g dark chocolate (about 1 cup dark chocolate chips).

This pie can really be an amazing thing to whip together in no time with pre-made ingredients or you can take the time to lovingly prepare it yourself!

You will need:
1 9-inch chocolate pie crust base (either prepared or store-bought)
3/4 cup dark chocolate fudge (either prepared or store-bought)
225g (8oz) full fat cream cheese
1 cup smooth peanut butter
1 cup granulated sugar
1 Tbsp butter or margarine
1 tsp vanilla extract
3/4 cup heavy whipping cream, whipped (OR 1 1/2 cup Cool Whip)
1 cup mini reeses peanut butter cups (dark or milk chocolate to taste)

IMPORTANT NOTE: Reduce sugar to 2/3 cup if using Cool Whip, as it is sweetened.

Yield: 1 9-inch pie

1. In a large bowl, combine cream cheese, peanut butter, sugar, butter, and vanilla using an electric whisk/mixer.

2. Gently fold the whipped cream into the peanut butter mix.  Set aside.

3. Warm your fudge slightly so that it is spreadable, and spread over your chocolate pie crust.

4. Pour your prepared peanut butter mix over the fudge.

5. Chop up reeses peanut butter cups and top pie.  Decorate with whipped cream if desired.


Monday 13 October 2014

Pumpkin Spice Latte


Yes, it's that time of year when everyone tries to figure out what is in Starbuck's pumpkin spice latte and debate about whether there is real pumpkin in it (there is not, but what is 100% honest and natural these days anyways?).  If you don't have £4 to drop on one, why not make your own?

Pumpkin hint for Londoners: Libby's tinned pumpkin can be found at Whole Foods if you are struggling to find it in your local supermarket.  I've only ever found it at Whole Foods after being tipped off by other american expats.  They also sell organic pumpkin, which is more watery, but fine for a drinks recipe.

You will need:
2 cups milk
1/2 cup prepared hot strong coffee
2 Tbsp tinned pumpkin puree
1 Tbsp vanilla extract (imitation/vanilla 'flavour' is fine)
3 Tbsp sugar
1/8 tsp ground cloves
1/8 tsp ground nutmeg
1/8 tsp ground ginger
1/2 tsp ground cinnamon
Whipped cream topping optional!

Yield: 2

1. In a saucepan, combine pumpkin, cloves, nutmeg, ginger, and cinnamon.  Stir on medium heat until bubbling and heated through.

2. Add the milk, vanilla, and sugar.  Stir until heated thoroughly and simmering slightly.  Increase heat if necessary, but stir constantly to avoid scalding the milk.

3. Remove from heat and add coffee to taste. I've given 1/2 cup as a guide.

4. OPTIONAL STEP: Pour into cups through tea strainer to remove any larger pumpkin fibers.

Serve with whipped cream and sprinkle with nutmeg for presentation points!  Enjoy!


Thursday 2 October 2014

Turkey Salisbury Steak


A perfect, quick, and healthy version of a childhood comfort food!

You will need:
300g (3/4 lb) Turkey Breast Mince
1 small egg
1 tsp Worcestershire sauce
1/2 cup dried bread crumbs
1/4 tsp pepper
1/2 tsp salt
1/2 tsp onion powder
1/4 tsp garlic powder
---
1 1/2 Tbsp all purpose flour
1/2 tsp pepper1/2 cup skimmed milk
1 cup hot water
2 beef oxo (bouillon) cubes
1 1/2 Tbsp vegetable oil
225g (about 9 oz) white mushrooms

Note: Recipe assumes the gravy is started as soon as the 'steaks' hit the frying pan.

1. In a medium bowl, combine bread crumbs, pepper, salt, onion powder, and garlic powder.  Mix.

2. Add turkey mince, Worcestershire sauce, and egg to bowl.  Combine as though you were making hamburgers and shape into 4 oblong-shaped patties.

3. In a greased frying pan, cook patties until browned on each side on a medium heat.  Ensure that patties are fully-cooked (this can be done by keeping pan covered during browning).  Remove from heat and keep covered/warm.

4. For the gravy, start by chopping up and frying the mushrooms in a bit of oil.  Set aside.

5. In a saucepan, add flour and pepper.  Whisk in oil.  Heat until bubbling.

6. Dissolve oxo cubes in water and add to saucepan.  Whisk and add milk.

7. Once combined, return mushrooms to saucepan and continue to heat until bubbling and thickened.

8. Serve steaks smothered in gravy!  Lovely with potatoes and veg.

Thursday 18 September 2014

Personal Deep-Dish Pizzas


I broke out my mini springform pan again, this time for a savory recipe!  Personal Deep-Dish Pizzas!

As it is a pizza, you can put any fillings you want in it.  What follows are some filling suggestions and then a general recipe.

Filling suggestions:
Chicken + Crispy Bacon + BBQ Sauce + Mozzarella
Fresh Basil + Fresh Tomatoes + Tomato Sauce +  Pepperoni + Mozzarella + Parmesan Shavings (top)
Pepperoni + Spicy Sausage + Tomato Sauce + Mozzarella
Chorizo Sausage + Peppers + Tomato Sauce + Mozzarella

You will need:
1 packet quick rise-dry yeast
1 cup water
2 Tbsp olive oil
1/2 Tbsp sugar
1 tsp crushed sea salt
2 1/2 cups flour

Yield: 2 6-inch deep dish pizzas


1. Combine dry ingredients: salt, sugar, flour, and yeast in a medium bowl.

2. Heat water to 130 F, immediately add water (once heated) and olive oil.  Stir until thick.

3. Turn dough onto floured surface, kneading for 5 minutes.

4. Return dough to bowl and cover with kitchen towel, let sit for 5 minutes.  Now is a good time to very lightly grease your springform (or deepdish) pan.

5. Cut dough in half, and roll out.  Keep in mind it will rise to nearly twice its height.

6. Lay dough over pan and press in, as though you were placing a pie crust.  Press into sides if necessary.

7. Use fork to poke holes in dough, then cover with a kitchen towel and let rest for 15 minutes.  Preheat oven to 400 F/200C.

10. Bake on a flat baking tray at 400 F/200C for 10 minutes.  Be sure to have toppings ready.

11. Remove pizza crusts from oven, and fill your pizza(s).

12. Replace in oven, generally 10 minutes, or until cheese has melted or slightly browned. You can check the middle is heated by quickly stabbing through the fillings with a small knife. When you pull the knife out, check the temperature of the metal.  If cooking with raw meat, a food thermometer may be necessary.


Friday 5 September 2014

Disgustingly Delicious: Pt. 2


Okay, so there is a part 2. Because I have no self control.

I've actually seen comedians mocking this on multiple TV shows. The Buffalo Crunch Donut by Tim Horton's is described as yeast-based doughnut drenched in buffalo-style chicken wing sauce and covered in kettle chips. There is also a lovely pool of buffalo sauce in the middle with two lonely tortilla chips floating around. I have to respect what they were going for, but I really can't imagine this actually tasting good...


 Oh Taco Bell, I have been putting Doritos in my tex mex for years.... Late to the party with this one.


Another disgustingly delicious food item I've actually tried. Yeah. I ate that. It happened. Damn you Pizza Hut!

I almost caved in and got The Cheesecake Factory's fried mac n cheese balls the last time I was in America, but perhaps, wisely, thought better of it. I mean, you can't eat that for lunch AND get cheesecake for dessert. Right? (photo from chubbyheart.com)

It would, of course, be a mistake not to go abroad in my search of disgustingly delicious food. This burger(?!) from Burger King in Japan fits the bill. Dubbed the 'Ninja Burger', its bun is made black with bamboo charcoal and inside is a burger, a hash brown, an oddly-shaped piece of bacon, lettuce, and a special sauce. I would love to get my hands on this!

Sunday 31 August 2014

Disgustingly Delicious

Five foods that look simultaneously disgusting and delicious

The Krispy Kream Burger of delicious doom


I would love to land on this plate of Denny's cuisine, face first.  But of course, shouldn't. Is this still being sold?!


KFC's double down sandwich, is probably too much chicken for me.  I NEED CARBS.


foodbeast.com
I take my hat off to the inventors of the Fat Darrell sandwich (which includes chicken strips, mozzarella sticks, fries, topped with marinara sauce, lettuce, and tomatoes), as I always saw putting all my favorite foods into one bun/bowl/etc as one of my unique cooking qualities.  Not so unique :(


NYC's Cer Te sold this Thanksgiving Pizza duing the festive season (which included turkey meatballs, mashed potatoes and gravy, cranberries and butternut squash, topped with mozzarella). In similar news, I had heard Tesco was selling a Christmas pizza, but was unable to check it out, personally.

This list could probably go on for years, so I've forced myself to stop at 5. Must. Stop. Googling.

Thursday 21 August 2014

Oreo Cheesecake (US/UK)


Cheesecake #2!  Since these cookies n cream cupcakes were so tasty, I thought I'd work out a recipe for a similar cheesecake.  Enjoy!

You will need:
140g (just under 5oz.) Oreos or similar chocolate and cream sandwich biscuits
150g (just over 5oz.) Chocolate biscuits, preferably Oreos with the cream removed
3 Tbsp melted butter
350g (~12oz) full fat cream cheese
200g (~1 cup) granulated sugar
3 eggs
100ml (just under 1/2 cup (.42)) soured cream
1/2 Tbsp flour
2 1/2 tsp vanilla extract

You will also need a 6-inch springform pan.

1. Crush 150g chocolate biscuits to a fine sandy texture.  This is best done either in a food processor or in a strong food storage bag with a rolling pin.

2. With your hands, mix crushed biscuits and 3 Tbsp melted butter in the springform pan.  Press around edges to form crust.

3. Crush 140g sandwich biscuits into large pieces.  Set aside.

4. In a large bowl, cream together the sugar and cream cheese. 

5. Mix in eggs.

6. Mix in flour, soured cream, and vanilla.

7. Once smooth, stir in oreo pieces with a large spoon.  Set aside a few tablespoons for a topping after baking.

8. Pour into crust.

9. Bake for 45 minutes (or until set) at 175 C (250 F).

10.  Allow to cool before topping with remaining oreos and placing in the fridge to chill for 5-6 hours.  

Sunday 20 July 2014

Spicy Blended Green Vegetable Soup


I've been at it again, trying to invent reasonably healthy recipes that actually taste good.  My husband agrees, I have hit the nail on the head with my spicy blended green veggie soup!  This soup uses potato and veggies as thickener instead of a roux or cream. Health! Great recipe for picky eaters as well, no bits if you leave off the garnishes that do not suit your tastes.

You will need:
1 small potato
1 clove garlic
1 1/2 spring onion
2 large stalks celery
1 cup broccoli
1/4-1/2 tsp minced green chili (depending on spice preference)
2 1/2 cups water
2 chicken stock cubes (or vegetable stock for veggies)
1 1/2 Tbsp smooth peanut butter
1/4 tsp red chili flakes (for garnish)
1 Tbsp olive oil or cooking spray

Yield: 2 large servings

1. Wash and peel potato, chop into chunks and set aside.

2. Slice one clove of garlic and set aside.

3. Wash spring onion, celery, broccoli, and chili.

4. Slice celery, spring onion, and broccoli into large segments, set aside.  If you'd like spring onions as part of a garnish for the soup, thinly slice a couple of the segments and set aside from the rest of the vegetables.

5. Mince or cut green chilies into sliver-thin strips.  Set aside any you would like to use as garnish.

6. In a medium pan, heat oil and fry garlic and celery until fragrant.

7. Add water, potato pieces, spring onions, broccoli, green chili, and peanut butter.

8. Boil, covered, for 10 minutes or until vegetables are tender.

9. After 10 minutes, remove some of the soup water (about 1/2 a cup is fine) and dissolve the chicken stock cubes before returning the soup/stock mix to the pan.  Stir and remove from heat.

10. Add soup to blender (or use hand blender) to blend soup smooth.

11. Serve hot.  Garnish with spring onions, chili slivers, and red pepper flakes to taste.

Monday 7 July 2014